If you see dust in your indoor air, even though your Honeywell air purifier is ON.
It is the right time to clean the Honeywell air purifier, this increases the efficiency of the unit.
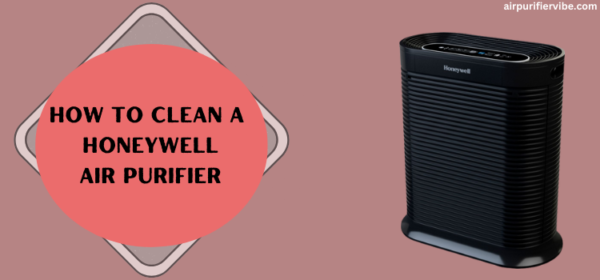
Cleaning the Honeywell air purifier is a simple, easy, DIY process, that can be done at home.
In this article, we’ll guide you through the step-by-step process of cleaning the Honeywell air purifier, helping you maintain the air purifier.
Without any further ado, let’s start cleaning your air purifier.
How Often Should I Need to Clean Honeywell Air Purifier?
Generally, it is recommended to clean the Honeywell air purifier once in every three months.
However, it is completely dependent on how often you run your air purifier and also on the outdoor air quality.
If you run your air purifier 24/7 or you live in an area prone to dust particles, then you need to consider cleaning your air purifier frequently.
You also need to check the filters, if the filters are washable, you can wash the filters to remove the dust.
After washing, you need to air dry it before placing it in the air purifier.
If the filters are non-washable, you need to replace them, if the filter has completed its lifespan.
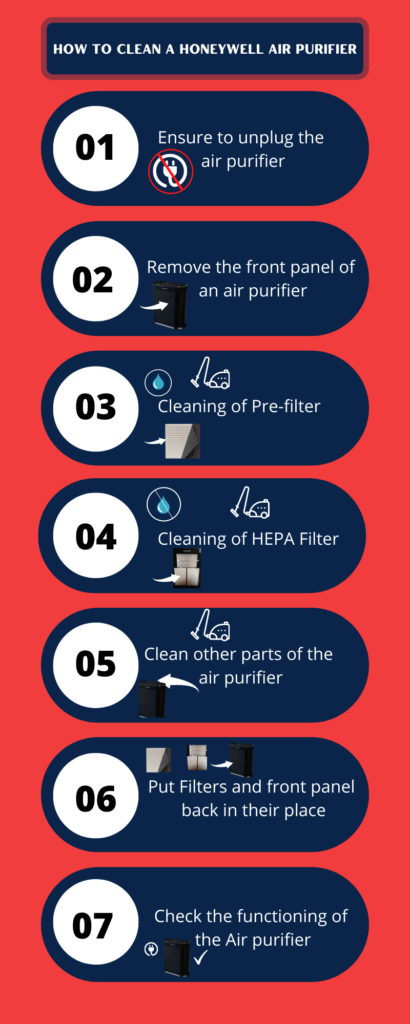
Step-by-Step Process on How to Clean a Honeywell Air Purifier
The following are the materials required before starting the Cleaning Process.
Materials Required For Cleaning:
- Cloth
- Vacuum cleaner
- Water
This step-by-step guide will help you clean your Honeywell air purifier quickly and efficiently.
Make sure you have all the materials you need for cleaning before you begin. Once everything is ready, you can begin cleaning.
Step 1: Ensure to Unplug the Air Purifier
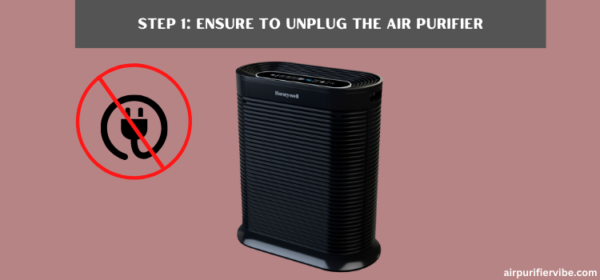
First things first, You need to Unplug the power cord from the socket.
It is an important step before you start cleaning the air purifier as it prevents any electrical shocks.
Step 2: Remove the Front Panel of an Air Purifier
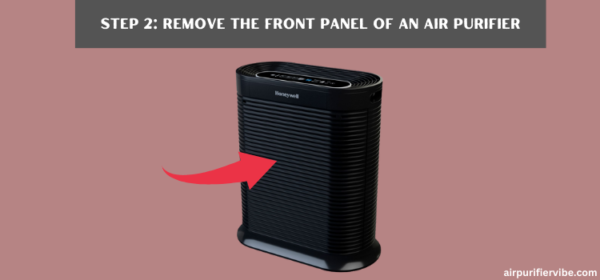
Now you need to remove the front panel of an air purifier so that you can access the filters.
To remove the panel you need to press on top of the panel with your thumbs and pull forward to detach it from the air purifier.
Now you can see, two types of filters in an air purifier. The first one is the Pre-filter and next to that is the HEPA filter and activated carbon filter.
Step 3: Cleaning of Pre-Filter
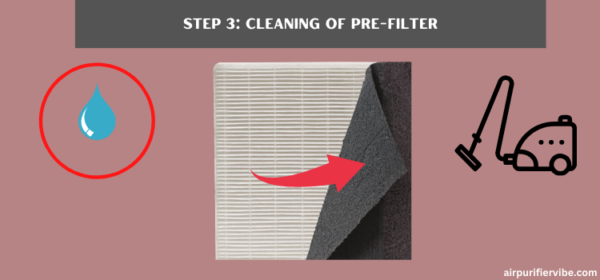
Pre-filters are the first filter in an air purifier and also the dirtiest one as well. It captures all the large particles present in the air.
Washable pre-filters can be cleaned and used again.
Honeywell air purifiers come with washable pre-filters. You need to follow the below steps.
a. Clean the Pre-Filter using a Vacuum Cleaner
You need to clean and remove the dust using a vacuum cleaner. A vacuum cleaner creates a vacuum and sucks the dust particles without releasing them into the air. It also prevents getting recontaminated.
Ensure that the Pre-filter is cleaned properly, there should not be any residue of dust on it.
b. Soak the Pre-Filter in Water
Next, you need to soak the pre-filter in lukewarm water this helps in removing the dust from the corners.
Keep Pre-filter for 10 minutes in the water that ensures effective cleaning.
c. Rinse with running Water and Dry it.
Finally, you need to rinse it with running water to remove any residues (if required you can use a soft brush for dust removal, but do not rub strongly which can tear the filter).
Now, you need to place the filter in a well-ventilated dry shade for drying. Do not place it in direct sunlight.
Step 4: Cleaning of HEPA Filter
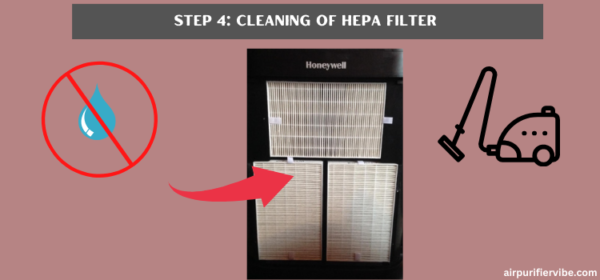
The next filter is a HEPA Filter in an air purifier. You can clean this filter with a vacuum cleaner to remove dust or airborne particles.
You should remember that do not use water to clean this filter. Be careful not to get the filter wet.
If the lifespan of the HEPA filter is completed, then you need to replace the filter.
Step 5: Clean Other Parts of the Air Purifier
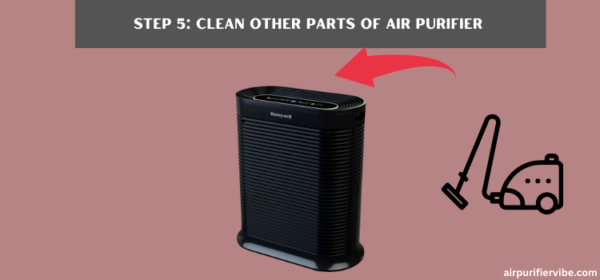
Now clean the air purifier from the outside with the help of a damp cloth. This helps to remove dirt and dust that settle on the air purifier.
Next, You need to clean the air purifier from the inside with the help of a vacuum cleaner. If required use a soft brush to remove dust particles from the air purifier.
Step 6: Put the Filters and Front Panel back in their Place
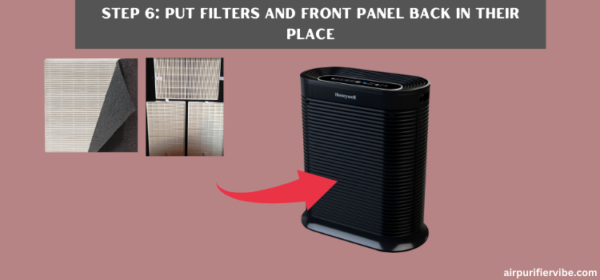
Now you need to place the cleaned filters in their position securely, after ensuring that filters are clean and dry.
Check the position of filters and align them properly in an air purifier and ensure it is fixed well.
Now put the front panel to close the air purifier.
Step 7: Check the functioning of the Air Purifier
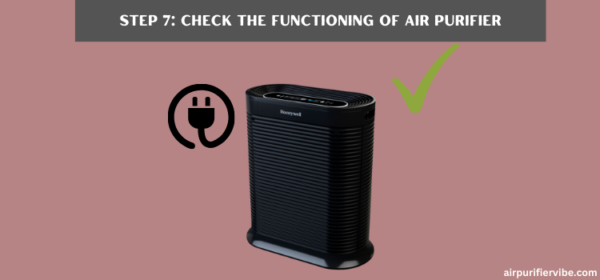
At the end of the cleaning process, it is important to verify that the air purifier is functioning properly.
You need to plug in the air purifier to check its performance.
This ends the cleaning process of an air purifier in simple and easy 7 steps.
Conclusion:
The Honeywell air purifier needs regular cleaning for its proper maintenance. It also helps in maintaining clean air in the room.
By following the step-by-step process of cleaning the Honeywell air purifier, you can easily perform this task at home.
Before starting to use, the air purifier you need to ensure the pre-filter is dried effectively.
Frequently Asked Questions
Can you Wash a Honeywell Air Purifier Filter?
Yes, you can wash the filter if it is a washable filter.
How Long Do Honeywell HEPA Filters Last?
Typically, Honeywell HEPA filters last 12 months, so they should be replaced once a year.
While Pre-filters must be replaced once every 3 months.